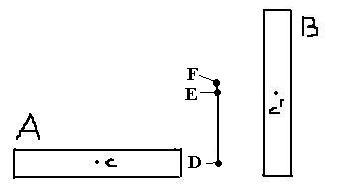
To stand monolith A on end, its center of gravity has to be raised a distance of DE, and to lay monolith B on a side, its center of gravity has to be raised a distance of EF. Both monoliths are in stable equilibrium because the center of gravity of each monolith is within the area of its monolith's base; however, it is clear that the degree of stability is different for each of these monoliths.
It does not take a person with advanced knowledge to learn that it is easer to raise the center of gravity of monolith B the distance EF (that is, push monolith B on its side), than it is to raise the center of gravity of monolith A the distance DE (that is, stand monolith A on end). Again, it is clear that the degree of stability is different for these monoliths.
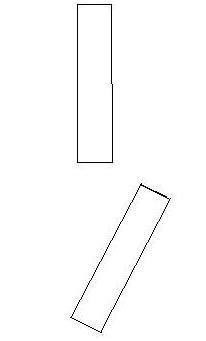
One does not have to rolex replica be a member of an advanced civilization in order to figure out that monolith B can be raised approximately half its length, minus its width, above the ground by lowering its center of gravity on to a support. We can raise the monolith, not by lifting it, but, by lowering its center of gravity on to a support. The diagram below illustrates a simple method for lowering the center of gravity of a monolith in order to raise it.
First, we tie a rope around the center of the monolith and attach the rope to an overhead support. Second, we dig out part of the ground beneath the base of the monolith and insert a small support. Third, we dig out most of the ground bent the monolith's base, and remove the small support. Fourth, we gently assist as the monolith seeks its new equilibrium position, ending up above the ground a distance equal to half its length, minus its width, and minus the stretch of the rope. Anyway, the monolith is raised , not by lifting it, but, by lowering its center of gravity on to a support.

Gravity acts perpendicular to replica watches the surface of the earth and toward the center of the earth. There is no component of gravity acting parallel to the surface of the earth. When a either of our monoliths (a or B) is moved parallel to the surface of the earth (that is, along the surface of the earth) the force of friction opposes the motion.
Rather than pushing or dragging monolith B along the surface of the earth, an equilibrium method (sometimes called "Tilt and Rotate") can be used. First, monolith B is tilted slightly in the direction the monolith is to be moved. Second, monolith B is rotated 1/2 a turn in the direction the monolith is to be moved. Now repeat steps one through two until you arrive at the location where the monolith is to be used.
Another equilibrium method (sometimes called "walking") can also be used instead of pushing or dragging monolith B along the surface of the earth. First, a worker stands behind the monolith and facing the direction in which the monolith is to be moved. Second, the monolith is tilted to the worker's right. Third, the monolith is rotated 1/8 turn. Fourth, the monolith is tilted to the worker's left. Fifth, the monolith is rotated 1/8 turn. Repeat steps two through five until the monolith arrives at the location where it is to be used.
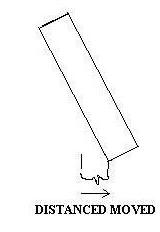
Monolith B can also be moved on a sled without pushing or dragging the sled along the surface of the earth. Monolith B can be stood on a specially designed sled (see diagram below). The monolith is tilted in the direction the sled is to be moved. This will cause the back end of the sled to rise. The back of the sled is rotated to the front. Simply repeat these steps until it arrives at the location where the monolith is to be used. Of course, this is just another version of the tilt and rotate method.
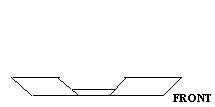
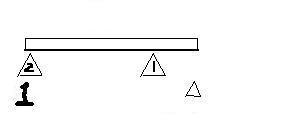
To rotate a large, rectangular stone overland we need three supports called fulcrums. Two of these fulcrums need to be the same size. The third must be smaller.
First we position the large, rectangular stone on the ground such that it is aliened in the direction in which it is to be moved. Then we use levers to raise the front end, and place the number one fulcrum about half way between the front of the large, rectangular stone and its center. Next using the levers we place the number two fulcrum under the back end of the large, rectangular stone. We can now rotate the large, rectangular Stone over land by repeating a series of steps over and over until we have reached the place where it is to be used.
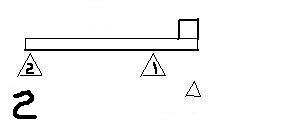
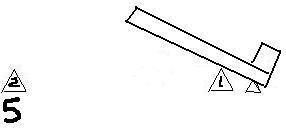
In step two (see diagram below) we place a counterbalancing weight on the front end of the large, rectangular stone. Here after the counterbalancing weight will be slid over the surface of the large, rectangular stone in order to get it to the desired end.
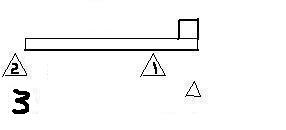
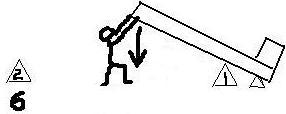
In step three (see diagram below) we push down on the counterbalancing weight so that the back end of the large, rectangular stone raises up off the number two fulcrum. Then we remove the number two fulcrum, and allow the large, rectangular stone, with the counterbalancing weight, to balance on the number one fulcrum.
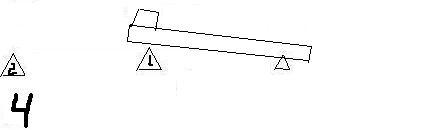
In step four (see diagram below) we rotate the large, rectangular stone in the forward direction. Now the counterbalancing weight is at the back end, and the free end is at the front. We place the number three fulcrum, which is the small fulcrum, under the free end of the large, rectangular stone. Because the number three fulcrum is smaller than the number one fulcrum, and because the large, rectangular stone is balanced on the number one fulcrum, we must push down on the free end of the large, rectangular stone until it rest upon the number three fulcrum. The large, rectangular stone is breitling replica now an inclined plane with the counterbalancing weight at the top.
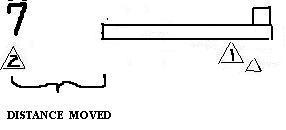
In step five (see diagram below) we slide the counterbalancing weight down the inclined plane of the large, rectangular stone. Then we push down on the counterbalancing weight so that we can remove the number one fulcrum from under the large, rectangular stone. Next we place the number one fulcrum about half way between the front end and the center of the large, rectangular stone.
In step six (see diagram below) we use the large, rectangular stone as a lever, pushing down on the back end, so that we can remove the number three fulcrum and again balance the large, rectangular stone and counterbalancing weight on the number one fulcrum.
Now we simply repeat steps four through six over and over until we have the large, rectangular stone where it is to be used. This allows the monolith to be moved without pushing, pulling, or dragging it, and requiring less work and fewer workers.
![]()